CI/CD Pipeline for React and Node.js with Kubernetes
In modern software development, Continuous Integration (CI) and Continuous Deployment (CD) play a vital role in ensuring that code changes are automatically tested, built, and deployed to production without manual intervention. When working with a full-stack application built using React for the frontend and Node.js for the backend, deploying them on Kubernetes offers scalability, high availability, and streamlined management. In this Node.js tutorial, you’ll learn how to set up the backend, configure your Node.js server, handle routing, and integrate with databases, preparing the application for seamless deployment. In this guide, we’ll set up a CI/CD pipeline for a React-Node.js application using Kubernetes for deployment.
What is CI/CD?
– Continuous Integration (CI): CI focuses on integrating code changes from multiple contributors into a shared repository, ensuring that the code is tested and verified. Automated tests are run as soon as new code is pushed, minimizing integration issues.
– Continuous Deployment (CD): CD automates the release of code into production. Once changes pass the CI stage, they are automatically deployed to the live environment. This reduces manual deployment processes and allows faster delivery of new features or bug fixes.
Why Use Kubernetes for CI/CD?
Kubernetes simplifies the deployment and scaling of applications. When used in a CI/CD pipeline, Kubernetes offers several benefits:
– Scalability: Kubernetes ensures that your application can scale up or down based on traffic and resource demand.
– Fault Tolerance: In case of a failure in any service, Kubernetes automatically reschedules containers on other available nodes.
– Rolling Updates: Kubernetes supports rolling updates, ensuring that your application stays live while new versions are deployed.
Building the Pipeline
Let’s break down the key stages of a CI/CD pipeline for a React and Node.js application with Kubernetes.
Version Control System (VCS)
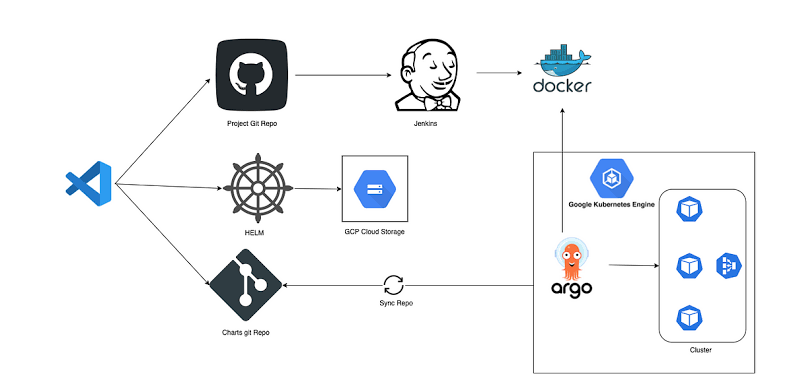
Start by hosting your application code on a version control system like GitHub, GitLab, or Bitbucket. The repository should contain two directories: one for the React frontend and one for the Node.js backend.
Whenever developers push new code, it triggers the CI pipeline. Webhooks or integrations with your CI/CD tool (e.g., Jenkins, CircleCI, GitLab CI) will automatically detect changes and start the process.
Continuous Integration (CI) Stage
In the CI stage, code changes are automatically tested and validated. This stage is vital for catching issues before they reach production.
Testing: Set up unit tests for both your React and Node.js applications. These tests will ensure that the core functionality of the application is working correctly after every commit. You can use tools like Jest for React and Mocha or Jest for Node.js. A successful CI stage requires that all tests pass.
Linting and Formatting: Integrating tools like ESLint (for JavaScript code linting) and Prettier (for formatting) ensures code quality and consistency.
Building: Once tests pass, build the React application into a production-ready bundle using Webpack or similar tools. In this React JS tutorial, you’ll learn how to optimize the build process by configuring Webpack to handle bundling, code splitting, and asset management for better performance. Simultaneously, prepare the Node.js application for deployment by installing dependencies and generating the final build. This involves setting up a clean production environment, optimizing database connections, and ensuring environment variables are properly configured for deployment. Both frontend and backend should now be ready for the next stage in the CI/CD pipeline.
Dockerizing the Applications
To deploy your applications to Kubernetes, you need to containerize them using Docker. Docker allows you to package your application along with its dependencies into a container image, ensuring that the app runs consistently across all environments.
Create Dockerfiles for both your React frontend and Node.js backend:
– React Dockerfile: Start with a base image like `node:alpine`, install dependencies, and run the production build.
– Node.js Dockerfile: Similarly, create a Dockerfile that installs dependencies and exposes the Node.js application for Kubernetes.
In this pipeline stage, the CI tool builds Docker images for both the React and Node.js applications and pushes them to a container registry like Docker Hub or Google Container Registry (GCR).
Kubernetes Deployment Files
Create Kubernetes deployment and service YAML files for both your frontend and backend applications. These files define how many replicas you want, how the containers will interact with each other, and how they will be exposed to external traffic (e.g., using Ingress or LoadBalancer services). Consult this Kubernetes cheat sheet for essential commands:
– kubectl create -f [file.yaml] – Create resources from a YAML file
– kubectl get services – List all services
– kubectl get deployments – View deployment status
– kubectl scale deployment [name] –replicas=[n] – Scale replicas
A typical deployment YAML file specifies the container image, ports, resource limits, and environment variables for the application. The service YAML file ensures that your containers can communicate with each other and the outside world.
Continuous Deployment (CD) Stage
Once the Docker images are built and pushed to the container registry, the CD stage automates the deployment of these new images to your Kubernetes cluster.
Kubernetes Integration: Tools like Helm or kubectl are used to automate the process of updating the Kubernetes deployments with the new container images. By using a Kubernetes cluster (e.g., on Google Kubernetes Engine (GKE), Amazon EKS, or Azure AKS), you can automate the deployment of both the React and Node.js applications.
Helm charts simplify version control for your deployments, enabling rollbacks if necessary. These charts also manage the configuration of the entire Kubernetes setup.
Rolling Updates and Monitoring
Kubernetes allows for rolling updates, which gradually replace old container versions with new ones, ensuring that your application stays live without downtime.
Monitoring: It’s essential to monitor your applications to ensure they are performing as expected. Tools like Prometheus (for metrics) and Grafana (for visualization) can be used to monitor the health of your Kubernetes deployments.
Logs can be collected and analyzed using ELK stack (Elasticsearch, Logstash, and Kibana) or tools like Fluentd and Kibana. This enables real-time tracking of issues or bottlenecks in your React or Node.js application.
Automating Rollbacks
CI/CD tools can be configured to detect if a newly deployed version causes errors or significant performance degradation. If that happens, the pipeline automatically rolls back the application to the last working version, maintaining stability in production.
Secure Your Pipeline
Security is crucial when building CI/CD pipelines. Ensure that only authorized users can trigger deployments, and sensitive information like API keys or database credentials are stored in Kubernetes Secrets rather than in code. Using a tool like Vault for managing secrets and credentials enhances security.
Conclusion
Building a CI/CD pipeline for React and Node.js with Kubernetes allows developers to automate testing, building, and deployment. It reduces human intervention, speeds up development, and ensures that the application can scale easily and perform consistently. By integrating tools like Docker, Kubernetes, Helm, and Prometheus, teams can streamline the entire process, from code commit to production deployment, with the added benefits of high availability, monitoring, and scalability.
Keep an eye for more news & updates on USAFullNews!